Showing posts with label Thanksgiving. Show all posts

November 23, 2015

Happy Thanksgiving

Hello everyone -- welcome back to Monday!

This week officially kicks off the Holiday Season -- starting with Thanksgiving,  Black Friday, Cyber Monday and all the (crazy!!) fun that comes with this time of year. With that in mind (and without getting too philosophical), I thought I'd focus on something that often gets overlooked and something that is especially important in our world near and far. Peace!


When I first saw Deena's French Country Prints - Wheat I knew I had to create something with this downloadable image. It's just gorgeous and was perfect for my Thanksgiving Day cards. The natural colors reflect the beauty of nature and fit in with my Peaceful Wishes theme.

French Country Prints - Wheat

You get two images with this downloadable -- one with a white background and the other with an aged burlap look! Aren't they just lovely!!


For my cards I used the white background image. After printing it and cutting it to the size of my card, I adorned it with a piece of festive gold ribbon and adhered the panel to a green cardstock card. I then attached the hand-stamped message "Peaceful Wishes" (also in green cardstock). The final touch was to add gold and pearl embellishments in the upper corner.


These cards were easy to make, but look so elegant. For more French Country Prints visit the Ewe-N-Me website!

Thank you so much for stopping by today! I wish everyone a safe, peaceful and lovely Thanksgiving!

Beth
prettybyrddesigns.blogspot.com


November 16, 2015

Thanksgiving - Cornucopia Tea Bag Envelope

Hello and Happy Monday everyone!

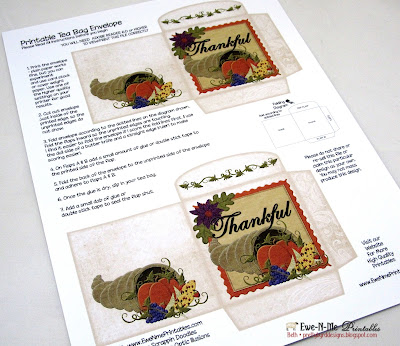
Today I'm featuring a delightful hostess gift that you can make and take to your Thanksgiving or holiday season party. I'm using Deena's Printable Tea Bag Envelope to make a card and a tea bag envelope.

The downloadable comes with instructions and two tea bags on one page.


I cut out the two tea bags and used one for the tea bag and the other for the card.


The tea bag is so simple. Just cut it out and score with your bone folder. Once that's done you just need to fold and glue!


I cut out the other cornucopia image and backed it with orange paper. I adhered that to an ivory panel and adorned it with shimmery orange trim and a purple paper flower. The colors really pop against that ivory background. I then attached the panel to a green card.


Here's what the finished project looks like:


The colors are so festive! This would make a thoughtful hostess gift or a lovely greeting for a family member or friend. It would also be a nice addition to a gift basket!

For more downloadable tea bags, please visit the Ewe-N-Me Printables website. There are envelopes for any number of occasions.

Thanks for stopping by and see you next time.

Beth
prettbyrddesigns.blogspot.com


November 13, 2015

Happy Thanksgiving!!!

Today I am having fun with these Thanksgiving Post Cards - Printable Hang Tags:
 

You get 2 of each design for a total of 8 hang tags and you can print as many as you need.

 
After printing and cutting out the images I layered them onto burlap, then attached them to the card bases and added some sequins.
 
These make really cute Thanksgiving Cards, invitations to Thanksgiving dinner, a set of note cards for the hostess are my top ideas.
 
Then I got out these cute bookmarks, when I was a little girl I always wanted Raggedy Ann and Andy dolls, Santa never brought me any but now I have these super cute tags to play with.


These were REALLY easy, all you need to do is print the images, cut them out, ink the edges if you like then layer them onto coordinating papers, the papers I used are all scraps. Punch a hole, add an eyelet if you like (my eyelets would not play nice with me so I didn't use any) and add a piece of twine.
 
Not only are these cute bookmarks, they would also be great tags for gifts and place settings for Thanksgiving dinner, putting the guest's names on the backs. 
 
Thank you for stopping by to take a look.
 
Sue


November 9, 2015

Feedsack Logos - Plymouth Turkey Grains

Hi everyone!

Today I'm featuring a product that I haven't used before -- Feedsack Logos. Although the intent is to transfer to fabric or paper, I'm using the Plymouth Turkey Grains image on a card.

Feedsack Logo - Plymouth Turkey Grains

The downloadable comes with an instruction page and three different sizes of images -- 8.5x11, 5x7 and 4x6. I used the 4x6 size for my cards.

After printing out the image, I cut it out so that it would fit on a 4-1/4 x 5-1/2 size card. I lost part of image when I cropped it but I like the way it looks and how it blends in with the red cardstock. 


The logo is bold yet simple, so I didn't want to add too many frilly embellishments. I glue a piece of black and white polka-dotted ribbon underneath the turkey and then a few adhered three silver nail heads. I adorned the top corner with a pewter-toned paper clip for a final decorative touch.


This card would be perfect for a Thanksgiving greeting, or for any occasion this season.

I hope you enjoyed this feature today! Glad you stopped by!

For more Feedsack Logos, please visit the Ewe-N-Me Printables website here!

See you next Monday!


Beth
prettybyrddesigns.blogspot.com


October 30, 2015

Autumn Bookmarks & Thanksgiving Tea Party

I have two projects again this week. First up are these really cute bookmarks.


You get 1 of each bookmark, a total of 4 and you can print as many as you need.

 
Deena's files are so easy to work with, you can print, cut and assemble these in about 30 minutes. After printing them out (I went a little out of the lines on the last one) I inked up the edges then I used up some scraps of fall papers to back the bookmarks with (one is mounted on black so you can't see it in the picture). I also punch holes in the tops, add an eyelet and a piece of twine.

These would make nice teacher or hostess gifts.

Now it is time for a Thanksgiving Tea Party, actually more of a Black Friday Tea to give everyone time to take a break and get revived by tea, scones w/lemon curd, tea sandwiches, fresh fruit, tiny deserts and chocolates. I'm going to stay home and make tea while everyone else is out fighting the crowds.


You get 2 tea bags on a page and you can print as many as you need.
 
For this simple invitation is very easy to make, I used a sheet of 8 1/2" x 11" brown cardstock, I cut it in half so that I had two pieces of 8 1/2" x 5 1/2". I scored it at 4 1/4", then I added a scrap of dark pumpkin which I embossed with a Cuttlebug folder from my stash. I chomped all 4 corners of both the card base and the pumpkin layer then I added a Thanksgiving Greetings Tea Bag on top, added some sequins and pearls. The sentiment was an extra that I had previously printed on vellum with my printer then layered onto a scrap of Kraft paper and adhered with foam pads.
 
Thank you for stopping by to take a look.
 
Sue


October 26, 2015

Angel Note Cards

I love small note cards because they are just so handy. They're so convenient to have on hand because they can be used in so many ways: along with a gift, to send a quick note to a someone or to use as a gift set. Deena's Hang Tags - Angel Postcards were the perfect images to use for the fall and upcoming holiday season.

Hang Tags - Angel Postcards

There are four different angels, and you'll receive two of each on a page.

After printing out the sheet, I cut out four images and adhered them to a rich brown cardstock. The colors on this downloadable are wonderful for this time of year and looked great against the brown background.


For a decorative touch, I added some curly-cue brads to each image. I used two black and two gold and they have a sparkly finish -- a perfect little detail for the holidays.


These angel tags were so much fun to create with. Deena makes working with her images so easy. Just print, cut and glue!!


For more hang tags, please visit the Ewe-N-Me Printables website here!

Thanks for stopping by!!

Beth
prettybyrddesigns.blogspot.com

October 23, 2015

Fabulous Fall Shaker Card & Thanksgiving Gift Boxes

I have two projects this week, Ewe-N-Me Printables has so many wonderful fall printables that I have a hard time deciding on which ones to work with and this week I came up with 2 different files and projects.

First up is a Fall shaker card that I made using this darling Fall Pockets file. There are 5 different bottle cap images, you get 6 of each image. These cut out very easily with a 1" circle punch.


After printing and cutting out my bottle caps I inked the edges.


I used a sheet of Kraft paper for the card base. I put two leaf stamps on the same stamping block and used red and green inks on them. I stamped the background, including the piece that I used for the shaker element. I laid that piece directly onto the Kraft paper and stamped them both at the same time.

The, "Fabulous Fall" sentiment is a Cricut cut and I used Cricut's Fancy Frames cartridge to cut the shaker layers. I cut 6 layers using empty cereal boxes and glued them together to form the frame for the card. I also cut a piece of clear acetate for the window and another piece of cereal box for the base of the shaker element.

After assembling the shaker element and letting the layers dry thoroughly (overnight) I added the bottle cap images and some sequins before adhering the clear acetate and top frame.

For a finishing touch I added a piece of green twine to the fold.

Then I got to work using the Small Farmhouse Labels - Turkey Labels.


I am a firm believer that the bigger the mess I make, the more fun I am having. These Thanksgiving Gift Boxes definitely lived up to that. You get 3 each of 3 different sizes and labels for a total of 9 labels, 3 large, 3 medium and 3 small.


I have had these paper Mache boxes for quite a while, looking for the right project to use them.
 
The first step was to give all of the boxes a couple of coats of Gesso, the Gesso seals the paper Mache making it easier for the paint to cover more evenly. 


After giving all of the boxes a couple coats of Gesso and paint I cut doilies to fit the tops using water color paper then I painted the doilies to mix and match the boxes. After the paint dried I added some twine and glued them to the tops of the boxes. I used the large label on the large box, medium on the medium box and small on the small box. I inked the edges of the labels then layered them onto pieces of black card stock and adhered them to the tops of the boxes with foam tape.


I also painted some wooden buttons, added twine and adhered them below the labels.


I also added a piece of ribbon around the bottom of the boxes.


These would make great Hostess Gift Boxes for Thanksgiving or to put Thanksgiving type munchies into before gifting them to a friend.

Thank you for stopping by to take a look.

www.suek86401.blogspot.com

November 28, 2014

Weekend Sale! - 50% Off All Printables

WEEKEND SALE
50% OFF ALL PRINTABLES
at 

Prices are all marked down...
no coupon codes necessary!

Sale Ends Dec. 2, 2014

New Items will be added
daily throughout the weekend.

November 12, 2014

Thanksgiving Greetings Cocoa Envelope

Happy Wednesday!

We're expecting a bit of snow today so what could be better than to snuggle up with a good book and a mug of hot cocoa! With that in mind, today I'm featuring a tutorial for Cocoa/Treat Envelope - Thanksgiving Greetings.

The downloadable comes with both the image and an instruction page. It's super easy and image is just gorgeous.


I printed it out on an 8.5"x 11" piece of white cardstock.


I cut out the image and scored the areas where you need to fold.


After folding the flaps in, I used double-sided tape to attach the front and back panels together.


These packets are just lovely, aren't they! They'd make great gifts for co-workers or friends!!


For more downloadable cocoa/treat envelopes, visit the Ewe-N-Me Website here.

Enjoy the fall season everyone! Thanks for stopping by!

Beth
prettybyrddesigns.blogspot.com


November 8, 2014

Give Thanks Pillow Box Placecard

I love to host the holidays and bring some fun and color as well as a treat to the guests at my table.  I printed this Give Thanks pillow box and used some stickers to embellish it as a place card for my mom.
I think that these will look so lovely on each person's plate.  I am going to fill them with some chocolate truffles as a sweet take home treat.  They print up so gorgeous and can be embellished in so many ways.

This awesome printable is called Give Thanks Printable Pillow Box   There are also so many wonderful new items in the store that you just have to pop on over for a visit.
Hugs,
Anita


November 7, 2014

Thanksgiving Greetings

Thanksgiving was celebrated recently in Canada, but it's yet to be celebrated in the United States, so I still have time to share some crafty ideas for it. We don't celebrate Thanksgiving where I leave, but we used to do some abundant and fun dinners at the american school where I studied... Good old days!


Today I have a card I made using a cute vintage collage from Ewe-N-Me Printables called Collage Sheet - Thanksgiving 102. I used the image of the girl holding a mirror for the turkey that simply blew my mind... How adorable and vintage is that image!


I made a card with lots and lots of layers and though this is a Fall card the color palette is very different. I picked the colors on the image for my card's color combination. I framed the image and made it the focal point of the card. I added a rosette, embellished with Fall leaves I die cut, colored with pigment and distress inks, and with Inkagold in yellow gold, to give them a nice shimmer. Other elements added were a die cut doily folded in half, gold cording and some crystals.

I hope you enjoyed seeing my card and if you need to make some cards I highly suggest you visit Ewe-N-Me Printables' store, because they have lots and lots of beautiful files for you.

Thanks so much for stopping by!


November 5, 2014

Thanksgiving Banner - Thanksgiving Greetings Collage Sheet


I had a lot of fun with this project, I started with the Thanksgiving Greetings College Sheet.


I embossed the flags with my eBosser, the Delicate Dots folder on the Kraft paper and Gracious Argyle folder on the cream paper.


I also cut some leaves using my Cricut then I also punched out a few leaves using some very thin craft metal and a leaf punch.


The pearl swirls are from Zva Creative.


Then I threaded the flags onto some heavy duty string, placing them 2 1/2" apart then I added a bit of hot glue to hold the flags in place.


This banner can be used anywhere in your home as a Thanksgiving decoration.

Thank you for taking the time to look at my Thanksgiving banner today.

Sue Kracker
www.suek86401.blogspot.com