Showing posts with label Autumn/Fall. Show all posts

November 27, 2015

Bookmarks & Gift Tags

Happy day after Thanksgiving, I hope that everyone had a wonderful turkey day.

Once again I have been busy playing with Deena's wonderful printables. I love these bookmarks, something keeps drawing me to them kind of like a moth to a flame.

 
You get two of each bookmark for a total of 4 on a page and you can print as many as you need. They make a nice little gift for any readers you know.
 
 
I made 2 cards and have 2 more bookmarks to give as gifts. After printing the file, I used some double sided tape on the back side and adhered a piece of Kraft paper to the back then I cut them with my paper trimmer and inked up the edges a little.
 
After adding a strip of dark orange paper I wrapped a piece of autumn leaves ribbon. I also punched a hole in the top of the bookmarks and added some twine. The bookmarks are adhered with foam tape so the recipient will be able to remove the bookmark and use it if they are very careful. A few sequins finished them off.
 
 
With these fall sheep hang tags you get 3 each of 3 different designs for a total of 9 tags and you can print as many as you want.
 
 
I was going to make some notecards but decided that gift cards would be nice. I also made envelopes for the cards with my We R Memory Keepers Envelope Punch Board.
 
I used scraps for the project, the card bases are 7" (before folding in half) tall by 3 1/4" wide. I scored and folded them at 3 1/2", added a strip of brown paper and the sheep images.
 
Thank you for stopping by to take a look.
 
Sue


November 23, 2015

Happy Thanksgiving

Hello everyone -- welcome back to Monday!

This week officially kicks off the Holiday Season -- starting with Thanksgiving,  Black Friday, Cyber Monday and all the (crazy!!) fun that comes with this time of year. With that in mind (and without getting too philosophical), I thought I'd focus on something that often gets overlooked and something that is especially important in our world near and far. Peace!


When I first saw Deena's French Country Prints - Wheat I knew I had to create something with this downloadable image. It's just gorgeous and was perfect for my Thanksgiving Day cards. The natural colors reflect the beauty of nature and fit in with my Peaceful Wishes theme.

French Country Prints - Wheat

You get two images with this downloadable -- one with a white background and the other with an aged burlap look! Aren't they just lovely!!


For my cards I used the white background image. After printing it and cutting it to the size of my card, I adorned it with a piece of festive gold ribbon and adhered the panel to a green cardstock card. I then attached the hand-stamped message "Peaceful Wishes" (also in green cardstock). The final touch was to add gold and pearl embellishments in the upper corner.


These cards were easy to make, but look so elegant. For more French Country Prints visit the Ewe-N-Me website!

Thank you so much for stopping by today! I wish everyone a safe, peaceful and lovely Thanksgiving!

Beth
prettybyrddesigns.blogspot.com


November 16, 2015

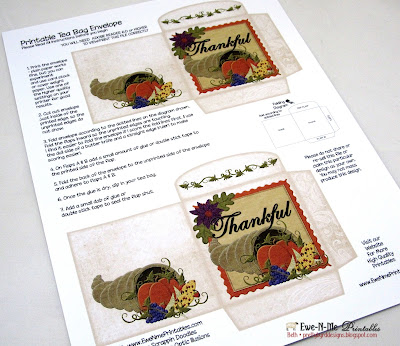
Thanksgiving - Cornucopia Tea Bag Envelope

Hello and Happy Monday everyone!

Today I'm featuring a delightful hostess gift that you can make and take to your Thanksgiving or holiday season party. I'm using Deena's Printable Tea Bag Envelope to make a card and a tea bag envelope.

The downloadable comes with instructions and two tea bags on one page.


I cut out the two tea bags and used one for the tea bag and the other for the card.


The tea bag is so simple. Just cut it out and score with your bone folder. Once that's done you just need to fold and glue!


I cut out the other cornucopia image and backed it with orange paper. I adhered that to an ivory panel and adorned it with shimmery orange trim and a purple paper flower. The colors really pop against that ivory background. I then attached the panel to a green card.


Here's what the finished project looks like:


The colors are so festive! This would make a thoughtful hostess gift or a lovely greeting for a family member or friend. It would also be a nice addition to a gift basket!

For more downloadable tea bags, please visit the Ewe-N-Me Printables website. There are envelopes for any number of occasions.

Thanks for stopping by and see you next time.

Beth
prettbyrddesigns.blogspot.com


October 23, 2015

Fabulous Fall Shaker Card & Thanksgiving Gift Boxes

I have two projects this week, Ewe-N-Me Printables has so many wonderful fall printables that I have a hard time deciding on which ones to work with and this week I came up with 2 different files and projects.

First up is a Fall shaker card that I made using this darling Fall Pockets file. There are 5 different bottle cap images, you get 6 of each image. These cut out very easily with a 1" circle punch.


After printing and cutting out my bottle caps I inked the edges.


I used a sheet of Kraft paper for the card base. I put two leaf stamps on the same stamping block and used red and green inks on them. I stamped the background, including the piece that I used for the shaker element. I laid that piece directly onto the Kraft paper and stamped them both at the same time.

The, "Fabulous Fall" sentiment is a Cricut cut and I used Cricut's Fancy Frames cartridge to cut the shaker layers. I cut 6 layers using empty cereal boxes and glued them together to form the frame for the card. I also cut a piece of clear acetate for the window and another piece of cereal box for the base of the shaker element.

After assembling the shaker element and letting the layers dry thoroughly (overnight) I added the bottle cap images and some sequins before adhering the clear acetate and top frame.

For a finishing touch I added a piece of green twine to the fold.

Then I got to work using the Small Farmhouse Labels - Turkey Labels.


I am a firm believer that the bigger the mess I make, the more fun I am having. These Thanksgiving Gift Boxes definitely lived up to that. You get 3 each of 3 different sizes and labels for a total of 9 labels, 3 large, 3 medium and 3 small.


I have had these paper Mache boxes for quite a while, looking for the right project to use them.
 
The first step was to give all of the boxes a couple of coats of Gesso, the Gesso seals the paper Mache making it easier for the paint to cover more evenly. 


After giving all of the boxes a couple coats of Gesso and paint I cut doilies to fit the tops using water color paper then I painted the doilies to mix and match the boxes. After the paint dried I added some twine and glued them to the tops of the boxes. I used the large label on the large box, medium on the medium box and small on the small box. I inked the edges of the labels then layered them onto pieces of black card stock and adhered them to the tops of the boxes with foam tape.


I also painted some wooden buttons, added twine and adhered them below the labels.


I also added a piece of ribbon around the bottom of the boxes.


These would make great Hostess Gift Boxes for Thanksgiving or to put Thanksgiving type munchies into before gifting them to a friend.

Thank you for stopping by to take a look.

www.suek86401.blogspot.com

October 21, 2015

Autumn Crows

Hey There,
Thank you for stopping by. Today I'd like to share some cute crow tags I whipped up using the file Hang Tags - Autumn Crows.


I printed my tags on photo paper and I really like the results. The colors just seem to pop on the glossy paper. Of course, if you know me, you know I can't just make a plain tag,  I almost ALWAYS put card stock on the back of my tags. I usually cut it a tad bigger than the tag... which is what I did here, so that it frames the tag.


Although, you can't really tell, I inked the edges of the tag and the card stock. I used an eyelet at the top with some red and black twine looped through.

I'm happy with the way these turned out, although, I'm not real sure these pictures do them justice. If you click on the pictures you'll get a much better look.


Come back and see us again!
Deena Davis


October 5, 2015

Spooky Halloween Cards

Hello Everyone!

I am so excited to be back and continuing on Deena's design team!!

While it's hard to believe summer is a distant memory, autumn is such a great time of year. Who doesn't love the beautiful colors, cozy fires and comfy sweaters! Of course, you can't forget Halloween -- truly a fun, fun, fun holiday for everyone.

Today I'm featuring a couple of cards I created using Deena's Farmhouse Labels - Skeleton, Blackbird, Night Owl. There are three different images, in three different sizes. And, you will receive two pages with this downloadable -- one with a white background and the other with a tan background.

Farmhouse Labels - Skeleton - Blackbird - Night Owl

The cards I created used the white background.


I started with a panel of dark brown cardstock to which I stapled a piece of burlap. The texture of burlap is so perfect for fall and adds to that rustic look. I then attached the panel to a kraft card.


I then cut out the larger images and glued them to the card, atop the burlap piece. Aren't these images fun? For a final touch, I attached a decorative paper clip to each card. I found these clips at the dollar store and knew they'd come in handy for one of my projects!!


The cards were so easy to make!! Give them a try!

For more inspiration, visit the Ewe-N-Me Printables website here.

Thanks for stopping by! See you next time.

Beth
prettybyrddesigns.blogspot.com


November 5, 2014

Thanksgiving Banner - Thanksgiving Greetings Collage Sheet


I had a lot of fun with this project, I started with the Thanksgiving Greetings College Sheet.


I embossed the flags with my eBosser, the Delicate Dots folder on the Kraft paper and Gracious Argyle folder on the cream paper.


I also cut some leaves using my Cricut then I also punched out a few leaves using some very thin craft metal and a leaf punch.


The pearl swirls are from Zva Creative.


Then I threaded the flags onto some heavy duty string, placing them 2 1/2" apart then I added a bit of hot glue to hold the flags in place.


This banner can be used anywhere in your home as a Thanksgiving decoration.

Thank you for taking the time to look at my Thanksgiving banner today.

Sue Kracker
www.suek86401.blogspot.com

November 3, 2014

Thanksgiving Note Cards

Hi everyone and Happy Monday!

It's November and today I'm getting ready for Thanksgiving and featuring small note cards I made using Deena's Collage Sheet - Thanksgiving Greetings.


The sheet comes with six images in two different sizes. They are just lovely with old-fashioned vintage scenes and warm fall colors - wow!


I began with white cardstock as the base of my cards and layered it with gold paper. I punched the corners to add a bit of interest and inked the edges in dark brown. I added a strip of red paper and then faux stitched the whole panel and attached two small pearls.


The red and gold paper really makes the images pop, and the white stitching and pearls contrast nicely against the rustic colors. After printing out the collage page I cut out four of the smaller images and then backed them with brown paper. The final step was to adhere them to the center of the cards!!


I just love how these images convey the feel of a traditional old-fashioned Thanksgiving holiday! I'm going to my sister's house for the holiday and I think this set will make a great hostess gift for her!


For more Thanksgiving and holiday downloadables, please visit Ewe-N-Me Printables!

Thanks so much for stopping by today!

Beth
prettybyrddesigns.blogspot.com

October 13, 2014

Halloween Cards using Bookmarks

Today I have some Halloween cards I made using the, "Halloween Bookmarks" Printables file. You get 2 of each bookmark, 4 on a page.


I printed the file onto cream colored cardstock, cut them out and used them as a pattern to cut out chipboard (I used an empty cereal box for chipboard) to add some rigidness to them. I used both copies of the bookmarks putting the chipboard in between them.


I added an eyelet at the top and added a piece of twine to the eyelet. I frayed a piece of burlap and added it to my card base, the cards measure 4 1/2" wide x 7" tall when folded. The burlap measures 3" wide x 7" tall. I adhered the burlap to the card face with double sided tape and the bookmark to the burlap with foam pads.


I also added twine and a button to the folded side and jewels to the opening side. They were fun and easy to make and I'm sure that my snail mail pals are going to love them.

Sue Kracker


October 1, 2014

Scarecrow Printable Recipe Cards

Hi, today is my first Ewe-N-Me Printables design team post. I decided to go with Scarecrow Printable Recipe Cards. My recipes are all over the place and I really need to organize them by season, these will be my Autumn/Fall recipes. I started by printing several copies of the file onto white cardstock then I cut them out.

I cut a recipe box with my Cricut using the Tags, Bags, Boxes and More2 cartridge using cream cardstock. When we lived in Michigan my fav fall activity was going to the cider mill for fresh cider, donuts and apples. I would turn the apples into a variety of different side dishes.


I lined the entire box with my brand of chipboard, an empty cereal box, cutting each piece of chipboard a little smaller than the area it was applied to.


This adds strength to the box and helps it to hold it's shape for a long time to come.

I also cut dividers using my From My Kitchen cartridge.


Then I decorated the outside of the box with ribbon (I attached the ribbon before assembling the box), cut a banner and added, "fall", punched some leaves of various colors and attached them to the box.


The Autumn/Fall theme of these recipe cards is perfect for my fav Autumn/Fall recipes. Now that we live in Arizona here it is the beginning of October and we are still running the air conditioner.


Sue Kracker