Showing posts with label vintage. Show all posts

May 9, 2016

Graduation Season

Hi everyone!

The month of May seems to herald in the season of celebrations and today I'm featuring graduation cards! I just love Deena's Collage Sheet - Victorian Bicycles and thought I'd be a bit whimsical and create cards with these wonderful vintage images.

Collage Sheet - Victorian Bicycles
You will receive six different images on an 8.5" x 11" sheet -- each approximately 3.5" high and done in a sepia tone.

I chose two different images for my graduation cards -- a male and female bicyclist. After printing out the downloadable, I cut out the images I wanted to use. 


Starting with the male cyclist image, I backed it onto dark brown cardstock and adhered it to a stone-colored card. I printed out the inspirational message and backed that with the same dark brown cardstock. The "journey" tag was stamped in black ink and done in vintage style. The three gemstones give this card a bit of celebratory bling!!
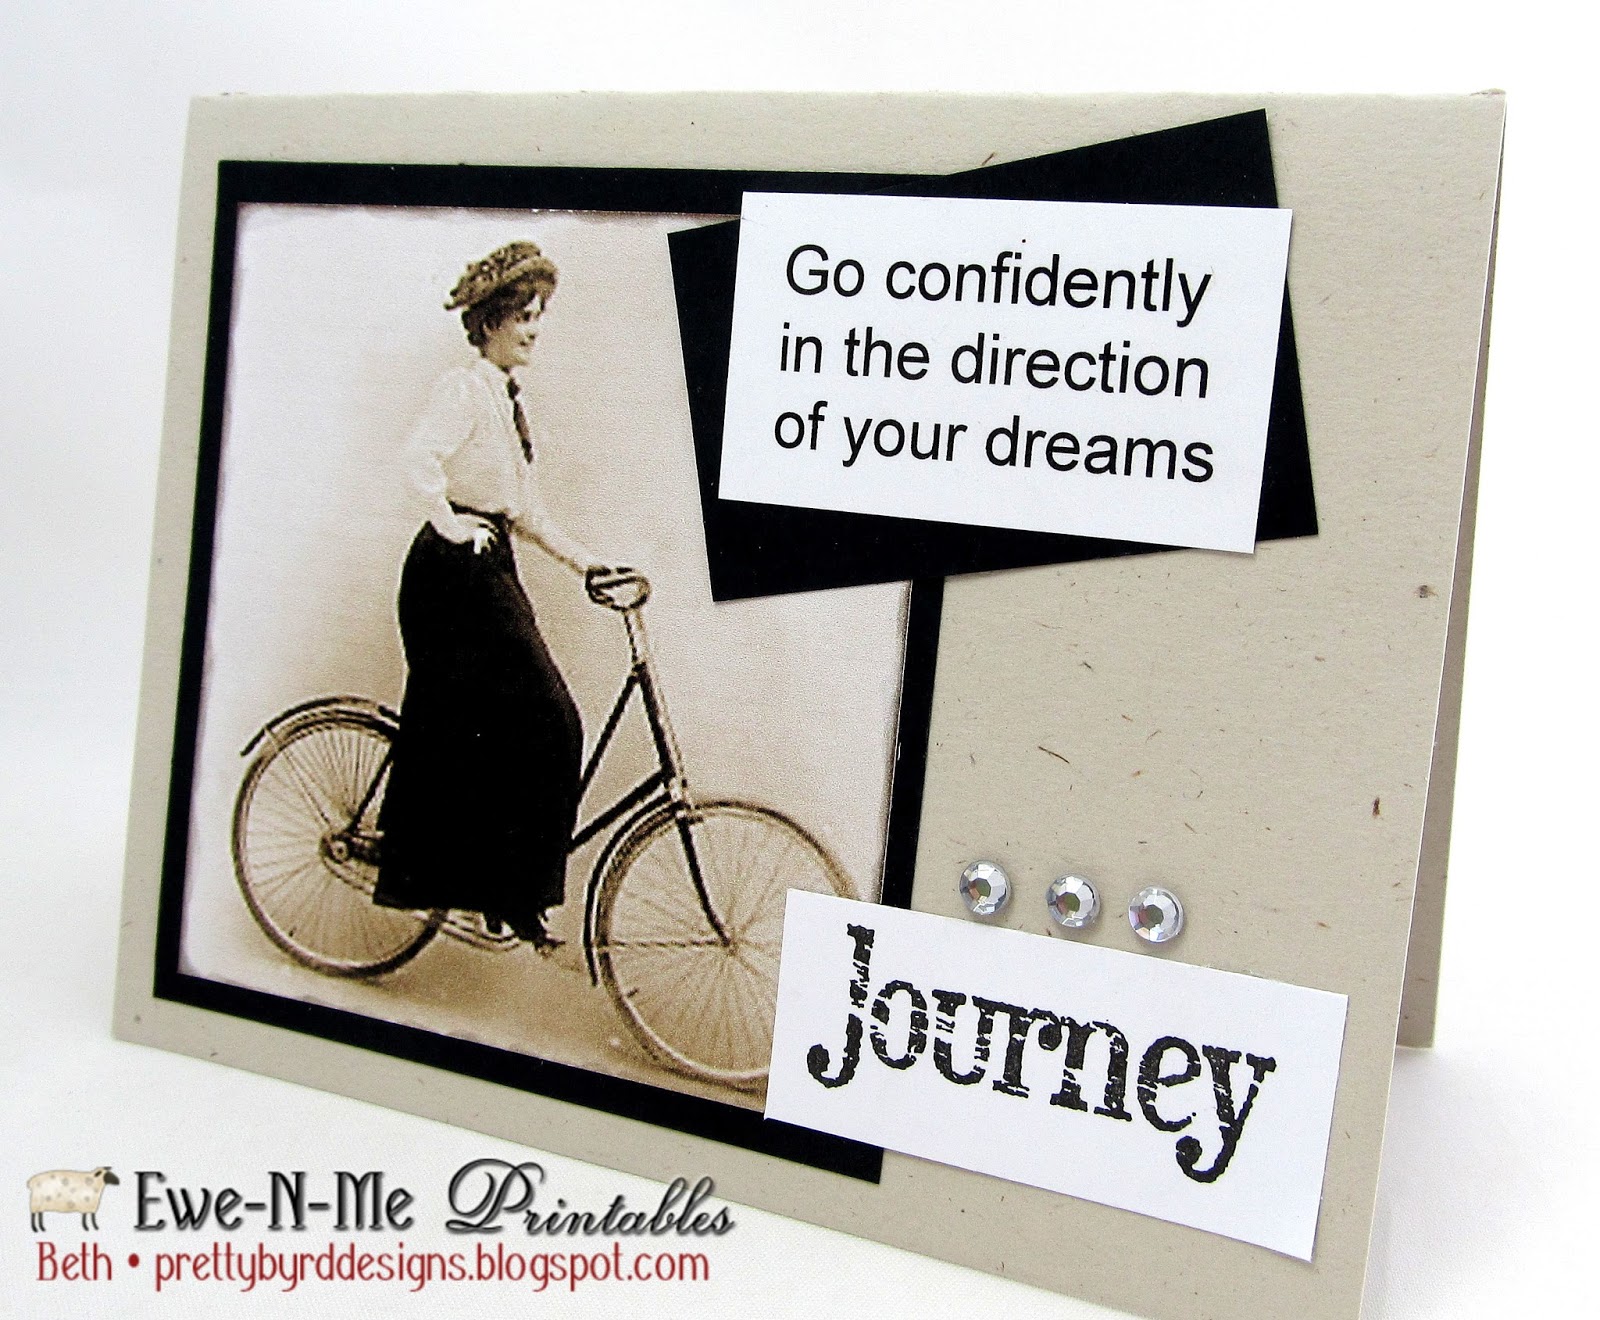

For the female cyclist image I used the same technique, using black cardstock as the frame for the image and inspirational message.

I just loved using these vintage images for my cards -- these images are perfect for many more projects, I'm sure!!

Please visit the Ewe-N-Me Printables website for your inspiration!

Thanks for visiting!

Beth
prettybyrddesigns.blogspot.com


May 2, 2016

Gift Tags with Flowers for Mother's Day

Welcome to the month of May! I think the thing I love most about this month is flowers. All of sudden everything is in bloom and beautiful colors abound.

Today I'm featuring a set of gift tags I created with Deena's Bottle Cap Images - Mother's Day Flowers. The colors are gorgeous!!

Bottle Cap Images - Mother's Day Flowers

There are six different floral images and you will get six of each -- for a total of 36 images on a page! The size of each round is a bit larger than one-inch.

I printed the downloadable on white card stock and punched out four of rounds using my 1-1/4" punch -- this leaves a bit of white around the edges, but I like the way they pop against the background of the tags.


I used four manila tags and lightly sprayed them with turquoise mist. When they dried, I stamped them with botanical images also in turquoise. To add a bit of contrast, I stamped "carte postale" in sepia colored ink to give them a vintage feel. I also distressed the edges of the tag in the sepia color.

For lack of a better word, I "scrunched" each round to give it a distressed feel and embellished each with a brad. I attached each bottle cap image to a tag and for a finishing touch tied a strip of turquoise seam binding to the top. The flower colors match perfectly with the turquoise accent!


These tags would be a lovely addition to a Mother's Day gift box or gift bag! The flowers images are so bright and cheery!!

For more bottle cap images, visit the Ewe-N-Me Printables website -- you are sure to be inspired!

Have a wonderful Mother's Day everyone! See you next time!

Beth
prettybyrddesigns.blogspot.com

April 18, 2016

Invitation for Coffee or Tea

Happy Monday!

As soon as I saw Deena's Primitive Pantry Labels Sheet I couldn't resist it! I love the vintage look -- the scripted lettering, color and decorative style! You will get eight printable labels on a sheet and each one is approximately 3.5 x 2.35 in size.

Label Sheet - Pantry Labels 101
While these labels would be perfect for a kitchen or pantry decor, I decided to use them on invitation cards. What a lovely way to organize a get together with loved ones or friends you haven't seen in a while.


I created this card using a white cardstock base and layered it with a panel of ivory and brown scripted paper. After printing and adhering the "Let's Get Together" panel, I glued the "coffee" label at an angle to give a bit of interest. I then decorated the card with a strip of white lace trim and ivory rose embellishment. 


Of course, if you're inviting guests for tea, you can use the same card with the "Tea" label. The rose and lace embellishments certainly make this a charming invitation.

This label sheet offers lots more possibilities for your home decor and vintage projects. I hope you were inspired as much as I was with this wonderful downloadable!

Deena's Ewe-N-Me website offers many more Primitive Labels, so be sure to check it out!

Thanks for stopping by today!

Beth
prettybyrddesigns.blogspot.com


March 28, 2016

Vintage Owls

We've made it to the end of March and I am looking ahead to lovely spring days and spending time outdoors! When I saw Deena's Hang Tags - Vintage Owls I thought of a woodland forest and the beauty of nature. These images are truly striking!

Hang Tags - Vintage Owls

While the colors remind me more of autumn than spring, I couldn't resist using them to make a few any occasion greeting cards. There are three different images and you will get three larger images and six smaller ones on an 8.5 x 11 page. I used the larger size for my cards.


I started with a brown card which I then layered with a panel of ivory textured paper. I stapled a strip of brown burlap to each card and then glued the owl image to each. The images really stand out against the ivory and brown background.


For a bit of decoration I added a paper square stamped with inspirational words in brown ink. I then adorned each card with a vintage style embellishment. 


I had so much fun making these cards and just love those owls! 

For more inspiration, be sure to visit Ewe-N-Me Printables and check out all of the great hang tags available for your crafting projects.

Thanks for visiting today!

Beth
prettybyrddesigns.blogspot.com


February 5, 2016

Vintage Cupid Bottle Cap Images

I was able to get 2 projects out of 1 file today. These Vintage Cupids of Deena's over at Ewe-N-Me-Printables are just too cute.

 
I had a small wooden box to work with, I took the hinges and closure off then I put on 2 coats of Gesso followed by 2 coats of Coral.
 
 
 After the paint was dry I used a 1" circle punch to cut out the images and inked my edges. I adhered them to the outside of the box. The heart flower buttons are from my stash, I painted them pink and green and added a pink pearl at the bottom.


I cut out the images for the card with my 1" circle punch, inked the edges then added some pink scalloped circles to their backs. Painted another heart flower and added a piece of twine to the middle and another pearl to the bottom. The sentiment is from my stash of stamps.

The washi tape on the top is from my stash. My Darcie Multi Sized Dots folder is what I used to emboss the card front.


I was a bit too close for this picture.


I only had room for 4 images on the outside of the box so I added the 5th image to the inside of the top. After gluing the images to the box I covered it with 2 coats of Mod Podge before I added the heart flower buttons.

Thank you for stopping by to take a look.

Sue
www.suek86401.blogspot.com

January 4, 2016

Birthday Card with Sepia Swirl Flowers

Hello and Happy New Year!

Winter has just begun, but already my mind is on flowers! Deena's Bottle Cap Images - Sepia Swirls provided me with the perfect opportunity to create a lovely floral birthday card.


The bottlecap images are not something that I have worked with very much, and I thought the new year would be a great time to explore some new creations. 

I love the Sepia Swirl images because they appeal to my love of vintage and they are so striking with the black floral image against the sepia script. There are six different one-inch round images -- and you will receive six of each on a page.

Bottle Cap Images - Sepia Swirls

For my card, I punched out four different images with my 1-1/4 inch punch. I like the white border with this size punch because it really makes the images pop against the kraft paper flowers that I adhered them to. I cut out stems and leaves with black card stock and glued them to a kraft card that came with a panel of canvas stitched to it. I glued the flowers to the top of each stem.


I attached the Happy Birthday panel to the bottom corner and adorned that with two pearl embellishments. The color of this card is so perfect of this time of year -- the flowers are so sweet but they don't look out of season.

Thanks so much for stopping by today! Wishing you all a wonderful New Year!

Beth

prettybyrddesigns.blogspot.com


December 7, 2015

Sleigh Bells Ring!!!

Hi everyone! Here we are on the first Monday in December!

I'm NOT going to do the count down to Christmas (because I don't want to panic myself or any of you)!! But, if you are looking for easy, quick and BEAUTIFUL Christmas card ideas you are in luck today!!

The cards I'm featuring were created with Deena's Label Sheet - Sleigh Bells Ring.


The downloadable features two different sizes of the label -- and you will get three of each size on an 8-1/2 x 11 page. Lable sizes are 3 x 3.75" and 2.5 x 3.25.I used the larger size for my cards.


After printing out the sheet, I cut out one of the larger images and adhered it to piece of a natural colored corrugated tile. I love the texture of these tiles and they work so well with Deena's vintage images.  I adorned the tile with a blue ribbon and wooden snowflake embellishment that I sprayed with pearl mist to give it a sparkling finish. I attached the finished piece to a blue card -- and I love the way the blue enhances the beautiful Sleigh Bell image!


I created a similar card using a white tile background. It really gives the card a bright and festive feel! Can't you just hear those sleigh bells?

I hope this gives you inspiration to create your own beautiful and festive cards!

For more Ewe-N-Me Label Sheets, please visit the Ewe-N-Me website!

Thanks so much for stopping by! See you next time!

Beth
prettybyrddesigns.blogspot,com


March 23, 2015

Live Simply Card

Hello -- and welcome to the first Monday in Spring!

Resolutions are always so popular at the beginning of the year. And here we are, months later. Has anyone kept up with their New Year's Resolutions? It's never too late to start fresh and what better time than the beginning of a new season.

That's why I love Deena's Live Simply Bookmarks. What a great reminder -- and isn't this image great?

Bookmarks - Live Simply

I printed the downloadable on white cardstock and cut out one of the bookmarks to use on a greeting card.


I trimmed the image so that it would fit on my 4 x 5-1/2 size card. After gluing the image to a piece of lavender paper, I attached a strip of ivory lace trim and adhered to a white card.


I added a little wooden butterfly embellishment that I stamped with french script in black ink.


Isn't this little girl just delightful? In keeping with the theme, I kept this card simple. It was easy to create and I only needed a few embellishments.

Thanks so much for visiting today!

Be sure to visit the Ewe-N-Me Printables website here, for more wonderful downloadable images!

Beth
prettybyrddesigns.blogspot.com


March 16, 2015

Sweet Girls - Little Gift Cards

Hello and Happy Monday!

Now that spring is here (well, officially on Friday), there are going to be all kinds of events, parties and holiday happenings in the not-too-distant-future!! You know -- Easter, Mother's Day, Weddings, Babies -- just to name a few.

If you are like me, I end up scrambling at the last minute for a gift card or tag, or even a thank you card. Today I'm featuring a set of four little cards that just might come in handy for those upcoming occasions.


These little cards were created using Deena's Collage Sheet - Sweet Girls  and I have to say these image are adorable! The collage sheet has six different images in two different sizes. I used the smaller 1.5" x 2.5" images today.


I selected four of the images and adhered them to a blue 3"x 3" card. Aren't they so sweet -- I love the vintage look! 


In keeping with the spring theme, I punched out pink flowers and attached one to each card. And, because I love a little sparkle, I added a bit of glitter to the edges of each image.


I'm going to keep these little cards on hand. They'd be handy for a last minute gift tag, or as a set could be used as hostess gift, too!

Please visit here for more of Deena's wonderful collage sheets!

As always, thanks for stopping by and do stop back soon!

Beth
prettybyrddesigns.blogspot.com


February 13, 2015

Mini Journal and Tag Set

Happy Friday everyone!

We've had another blast of winter here and I'm eagerly awaiting spring. One sure sign that spring is not far off is when I hear the birds chirping in the morning. With that in mind, Deena's tags Antique Nests seemed the perfect project to work on today.

Hang Tags - Antique Nests

I love the soft imagery mixed with the touches of blue. There are three images and you will get two of each on a sheet.

I decided to create a mini journal with a matching tag  -- I used all three images to make three different sets.


I printed the downloadable onto white cardstock and cut out all six images. As you can see, I kept one tag intact, and cut off the top and bottom from the matching one to use on the journal.


I cut out blue paper to size (3-1/4 x 4-1/2 - for the front and back covers) and glued the bird nest image to the front cover. The edges are decorated with scraps of white lace ribbon and trim. I then finished my journal by embellishing it with little pearl beads and a rustic button.


For the tag, I backed it with the same blue paper (not shown), added an eyelet to the top and tied pieces of twine and white string through it. Then I added a matching button and pearls beads.

These antique nests are so sweet -- I can't wait for spring! Don't they make a lovely set? Maybe you know someone who is longing for spring and would enjoy these! 

For more lovely tags, please visit Deena's website here.

Thanks so much for stopping by today!

Beth
prettybyrddesigns.blogspot.com


January 30, 2015

Afternoon Tea Invitation

I had a lot of fun playing with this file, I am a lifetime tea drinker and while living in Michigan one of my favorite things to do was to meet a friend for afternoon tea in some of Michigan's quaint tea rooms.
My first idea was to print up the envelopes, assemble them and try to arrange them in my doll's sandbox where a tea party goes on all the time. I also collect dolls, tea ware (mostly English bone china but I also have a few pieces from Japan).  But I really miss having afternoon tea so I made an invitation to afternoon tea at my home.
 
 
There are several different designs to choose from, I really like the Victorian/vintage look of this one. Tea Thyme Tea Bag Envelopes . You get two tea bag envelopes on each sheet, you just cut them out, fold on the lines and assemble.

 
After assembling my envelopes I made a mask with the dots in it and sprayed the cream colored paper with my eBrush then I trimmed it to the size I wanted, 4 1/4" wide (when folded) x 6" tall. I added a piece of washi tape from my son and his wife in Tokyo.
 
The bling swirl is from Zva Creative, I printed the sentiment onto a piece of vellum using my printer, I layered the vellum on to a piece of blue and adhered it to the card with foam pads. I also used foam pads to adhere the tea bag envelope and I tied a piece of twine along the folded edge.
 
 
Please excuse the rock, it was windy and I couldn't get it to stay open so I could get pictures. Here is the other side of the envelope, I used it on the inside to hold the menu.
 
 
If I was really having a tea party I would enclose a copy of the menu so if anyone being invited has an allergy to anything I'm preparing they can let me know so I also included one here. The inner piece is vellum, I attached it to the card with the twine, the menu is also printed on vellum. I would also send along a sample of one of the teas that are being served, putting it in the envelope on the front.
 
Thanks for stopping by.
 
Sue


October 3, 2014

Vintage Tag with Collage Sheet - Roses

Today I want to share with you a tag I made for  Ewe-n-Me Printables! I worked with the same collage sheet I used for last friday's vintage card: Collage Sheet - Roses. I, without planning, used the same image from the sheet, only the smaller one (the collage includes two of each image, a small and a large one).


This is a 5 1/2" x 3" tag I stamped, heat embossed, colored and distressed with ink, all on a vintage handwriting patterned paper. The small collage image was also distressed and mounted on the tag. This is a very nice and simple vintage project anyone can try out and it would certainly look very pretty on a gift bag.

I hope you liked my tag and that you feel inspired to create some projects of your own with this lovely digitals too! If you have any questions please feel free to leave me a comment here or at my blog.

Thanks so much for stopping by!

September 26, 2014

Rose Culture

Hello! It's Gracie from Graciellie Design and today I want to share with you a vintage card I made using Ewe-n-Me Printables' Collage Sheet - Roses. These images are beautiful, and they print so bright and pretty... Love them!


I used an unusual color combination to make this card and I love how it resulted. It really looks vintage and lovely. I couldn't resist adding a gold vintage button to the blue bow to finish my design.


I printed the digital image on white linen cardstock. The die cuts I used framed the image very nicely. I used light brown leather textured cardstock and light blue metallic cardstock for the frames. The yellow cardstock used for the card base is lightly textured and it's called Hawaii where I live.


I altered the largest frame to make it shorter. I basically cut it in half and adhered it again trying to get the right height for the front of the card. I ran across the middle of the frame a piece of blue satin ribbon and embellished it with a bow. This trick helped cover the die cut alteration.


I hope you liked my card. The collage sheet has so many pretty images, you could very easily make a complete set of cards.

Thanks so much for stopping by!

July 8, 2014

Mini Accordion Card using Hang Tags

Hi everyone! Welcome to a new post for Ewe-N-Me Printables. Today I have an adorable little project made with Hang Tags - Rose Post Cards.


This printable includes 4 different floral tags that are perfect for classic, vintage or shabby chic paper crafting. As you may know by now, I like to expand the possibilities of digital images and try out unexpected projects with them. I hope I can inspire you to free your imagination and create various different things with these amazing printables...

This time I made a mini accordion vintage card. Please take a look:


I completed the design with some embellishments, die cuts and stamps. The sky is the limit when it comes to printables, and this images are so pretty that they don't need much to make your project look elegant and delightful! 

Make sure you stop by the store and check out the recently added printables. If you'd like to purchase this particular file click here. There is such a variety of digital files... I know you will find something you like at a very affordable price!

I hope you enjoyed this project. If you have any questions feel free to contact me through a comment here or at my blog. Thanks so much for visit!